If you believe that your small vps server is not a target and it will not be shutdown you should wake up from your dream. There are hundreds of millions of bots crawling on the internet hitting every server on every port and everything they can get to, they will fetch it. In 2026 where ai made it easier and also these ai startups are crawling the internet constantly, the biggest viewer for my blog is from anthropic and other searchbots by a lot.
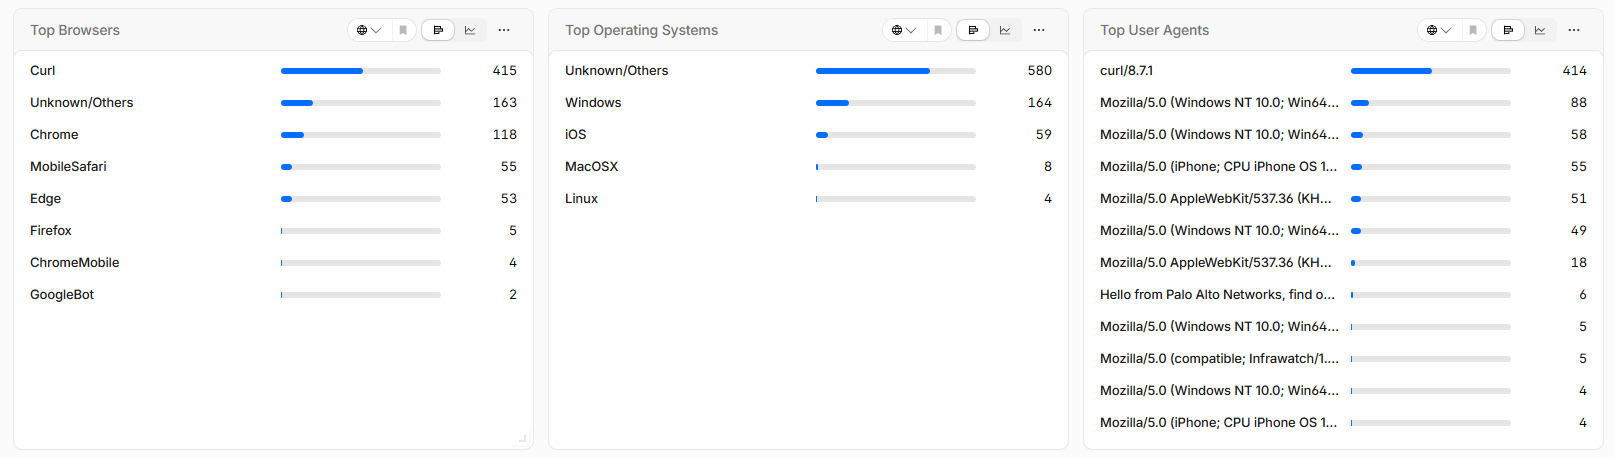
Last 24hours of analytics for my website zibar.me
Firstly I want to make a note here that this blog is written in July‑02‑2026. Security could change and some libraries below I used could have newer versions or even security vulnerability that is not yet discovered, so please do your search on each library and cve.
Secondly this doesn’t mean that your whole server is safe. The project code and their setup is way more important for it to be secure. The code you are hosting, the libraries you use on your project, you should verify those the most because they are easier to exploit. You should make sure that the code you have written is fully secure and not contain any backdoors or targets.
This could be used with any other vps providers. I have chosen digital ocean purely because it’s one of the most famous and I had multiple clients already with their projects setup here. It’s almost the same for contabo or hetzner.
Secure Your DigitalOcean Account First
This is the first step and the one people give little detail to it
- Enable 2 Factor Authentication – Very Important
- Use strong and unique password
- Don’t store those passwords in easy accessable locations to people
- Do regular checkup for the account activities
That should be your basic for any service you use.
Creating the Droplet
1. Choose a LTS Operating System
Always and I mean always choose the newest LTS version of your prefered OS. I choose ubuntu because it’s easier and most my servers run on it. Also don’t use custom or other market images, use the vendor provided newer LTS version.
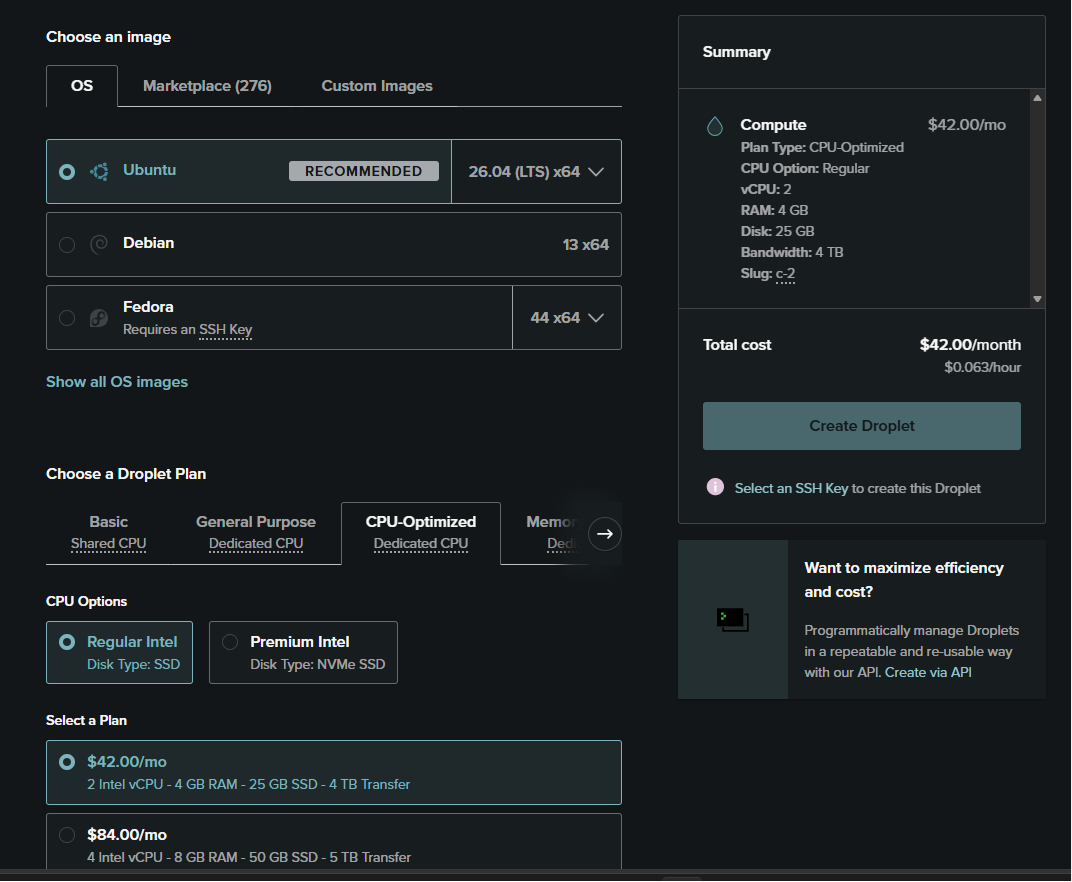
I choose ubuntu 26.04 LTS provided by digitalOcean
You can choose any of the plans that suites your need, even the $4.00 per month one they have, you should still follow these guides.
2. Use SSH Keys, Never Use The SSH Password Login
I am working on writing a new post about how to manage ssh keys securely and organize and manage multiples without issues and to audit them too on the server side. But for now firstly you will need to click on add ssh.
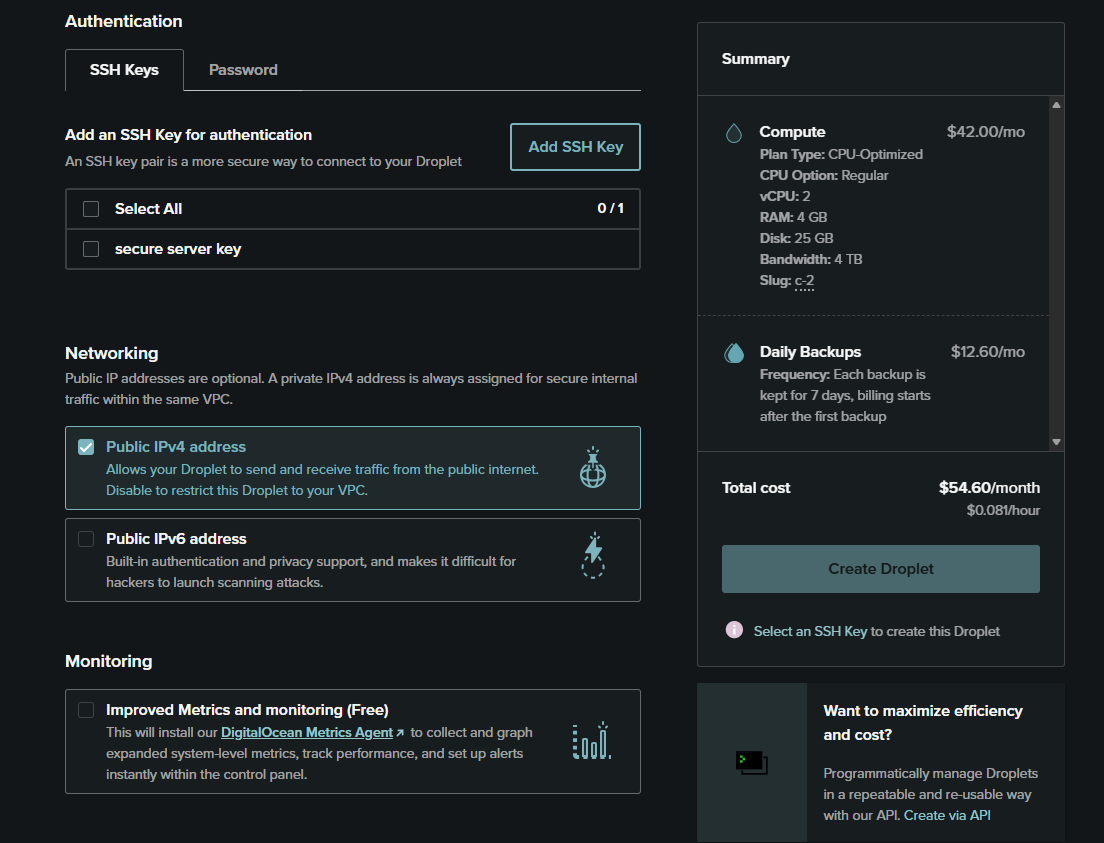
click on add ssh key
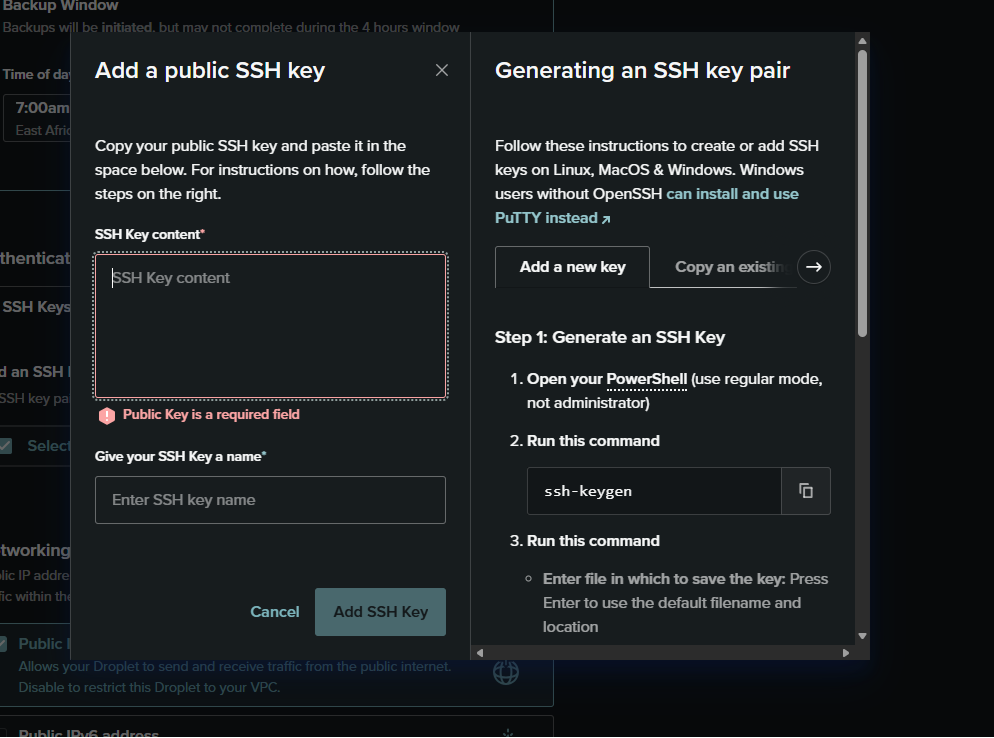
check the note on the right of how to generate the key
3. Use Vendor offered Backup Snapshots
Backups is one of the most important aspect for a project and it should be taken seriously when the project is being developed. Having several layers of backup is one of the secure ways to maintain a server’s reliability as you can always go back to the previous backups if something went wrong. This snapshot is of the whole operating system with its file system and services.
remember these are disaster recovery you should have a application layer backup for database and other important datas
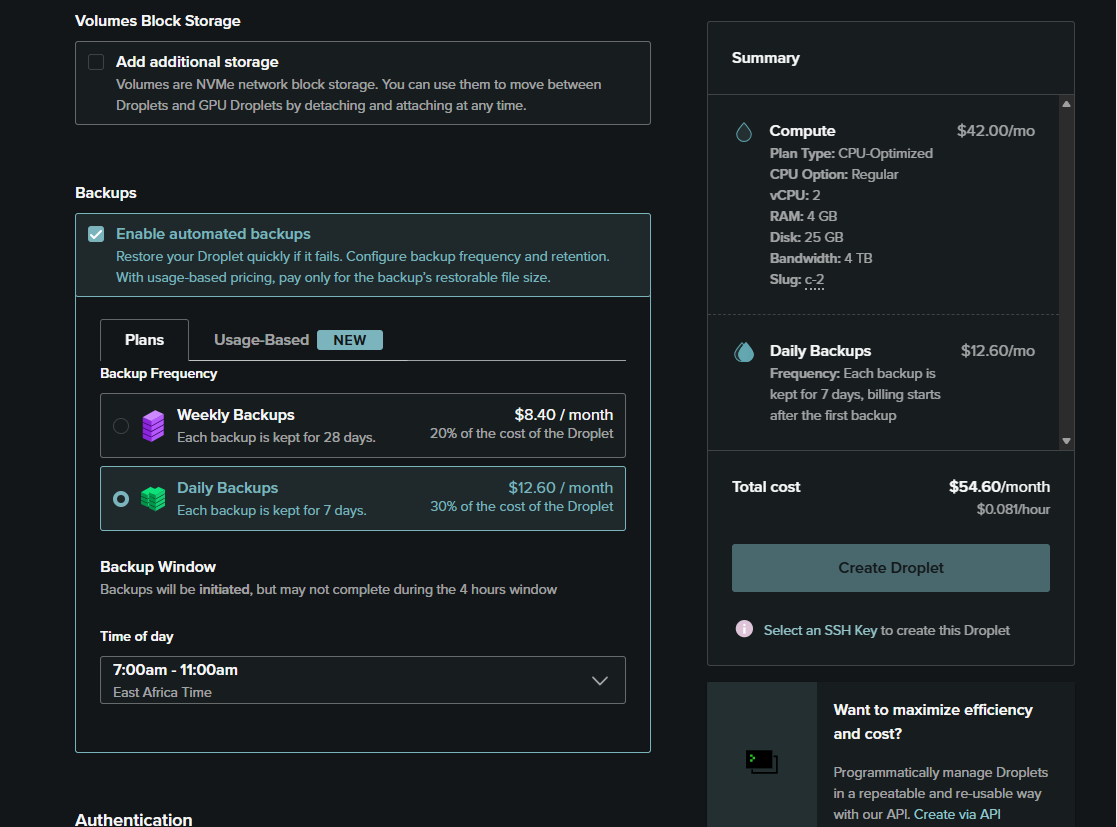
you can choose daily or weekly based on how regular your servers internal file/services change
Droplet is Created but still not secure
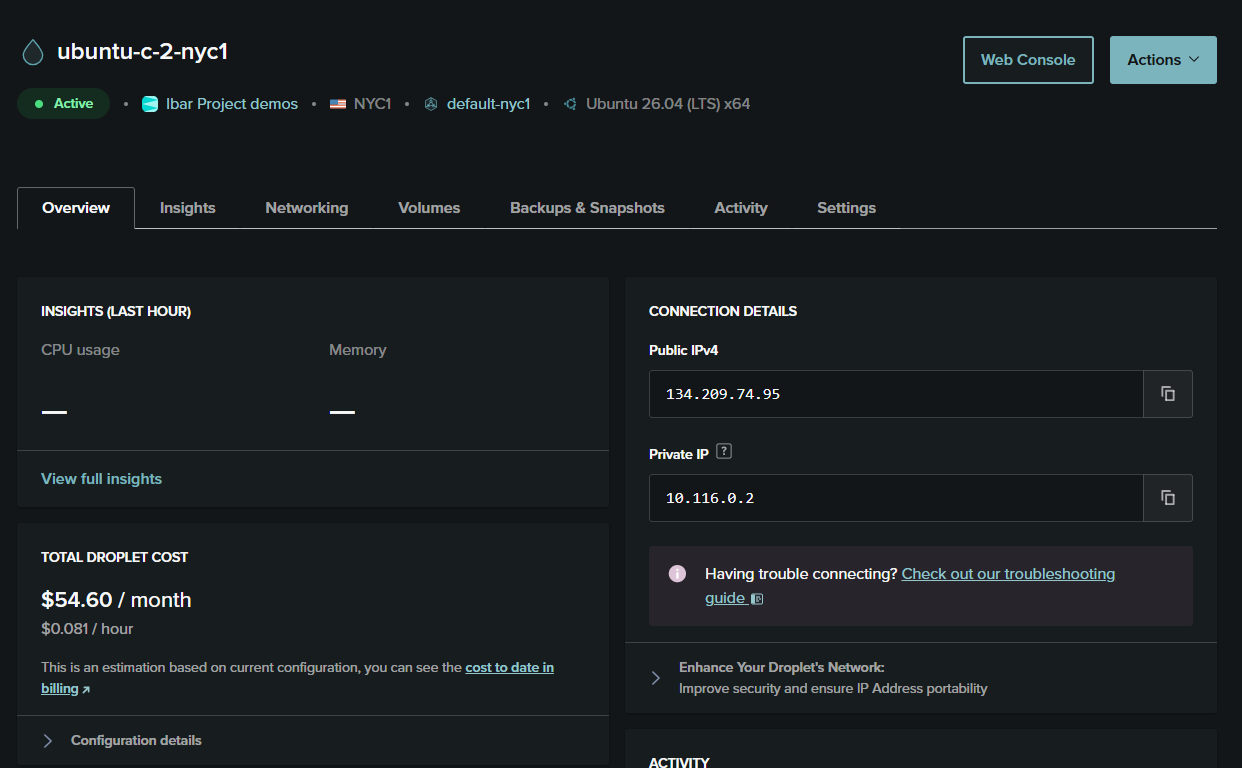
Securing Ubuntu
this is the part that actually almost the same for all servers and these guides are need exactly to be followed
1. Update/Upgrade
after login immidetly you should update and upgrade all packages on your server the vendor provided os may not have those updates Run important this script will logout you when the server restarts and also you may not need to reboot you have to verify if the package upgrade requires reboot
sudo apt update
sudo apt full-upgrade -y
reboot
2. Create normal Sudo User
after you ssh again as root it should be your last ssh to the server as a root and from now on you will use a new user that you will create
important i am creating a user for my self named zaki replace it with your username
sudo useradd -m -G sudo -s /bin/bash zaki && sudo passwd zaki
the -m creates the home directory for the user and -G adds the user to the sudo group the -s set their shell to bash and zaki is my username the passwd zaki trigers the password creation for my new user it will ask you password and confirm then it sets it
now you have your user you have to copy your public ssh key file to the new user so that can allowed to login
you can do that in multiple ways the easest one is just to copy the authorized keys file from root and used for this user too as they both have the same ssh key which is fine as we will disable ssh login for the root
again replace the zaki with your newly created user
mkdir -p /home/zaki/.ssh
cp /root/.ssh/authorized_keys /home/zaki/.ssh/authorized_keys
chown -R zaki:zaki /home/zaki/.ssh
chmod 700 /home/zaki/.ssh
chmod 600 /home/zaki/.ssh/authorized_keys
3. SSH to the server with the new User
|
|
ssh to the server from another session with the ssh keys to the new user if you login test the sudo power by typign su or su - root
sudo whoami
it shoudl return root when you run sudo whoami
now we will remove the root’s access from ssh so that no one will login as a root from ssh
4. Remove Root SSH Access
Now you will need to update the ssh config
sudo nano /etc/ssh/sshd_config.d/99-hardening.conf
now you will have to add this text to it
Replace zaki with your own username on AllowUsers this is actually serious and you may lose access to your server have to reset it if you don’t
# Connection Settings
Port 22

# Authentication
PermitRootLogin no
PasswordAuthentication no
KbdInteractiveAuthentication no
PubkeyAuthentication yes
PermitEmptyPasswords no

# Access Control please replace the allowUsers zaki to your username
AllowUsers zaki   # <--- replace with your username

# Forwarding and Tunneling Disabled
X11Forwarding no
AllowTcpForwarding no
AllowAgentForwarding no
PermitTunnel no

# Session Timeouts (5 mins idle time)
ClientAliveInterval 300
ClientAliveCountMax 2

# Operational Limits
MaxAuthTries 3
LoginGraceTime 30
MaxSessions 3
UsePAM yes
now save it with CTR+O enter and CTR+X to exit
and then test the config with
sudo sshd -t
if there is no error restart the the systemctl
sudo systemctl restart ssh
Now the SSH from the root should be fully blocked

Firewall and Network Security
Very Important don’t just copy past read and check the text this could lock you out of your server
1. Setup a VPN Connection
there is two approaches for this. one is that if your office or home network have a public static ip address then you don’t need a VPN. you will just close all ports except the public one and the private ones like ssh you make it only accesable with your static ip address only. that would minimize the threat a lot. but if you are like me whose home/office don’t have a direct static ip address and the isp dhcp assigns and changes our public ip address frequently then we need a vpn.
Youu should not allow SSH or other private ports to be public and accessable from any where Never
we need to setup a Tailscale account and secure it with 2factor authentication and other security reocmended from them. you can also use cloudflare zero trust network access ZTNA as a way to access your server without using the internet public ip address.
i will use tailscale but i have used both of them and i prefer the peer to peer network without any centrilized server checking and verifing my requests. this is way more privacy.
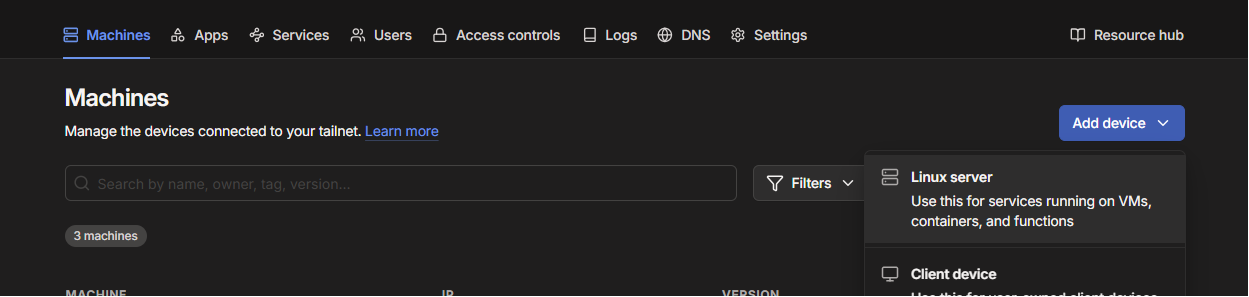
then you will have to give it a name and then generate a install script then copy that script to the server.
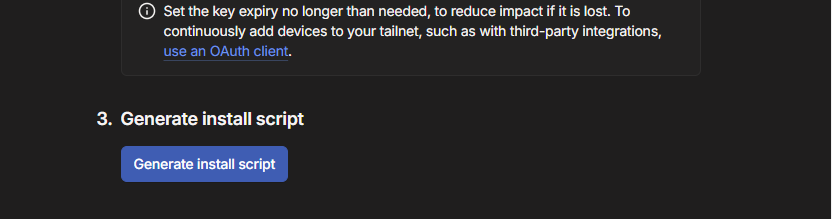
now tailscale is connected to our server. you have to install tailscale in your local machine too.
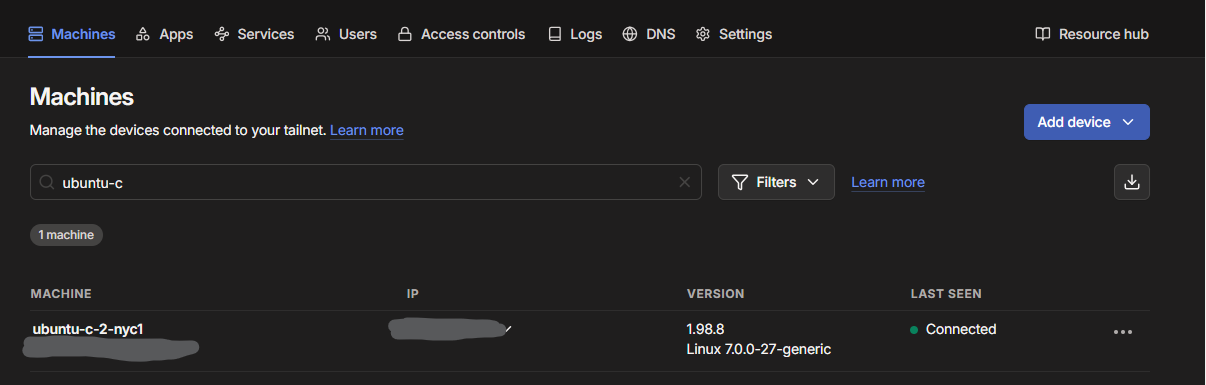
install tailscale on local machine / work machine. if the server private port need to be accessed by multiple people you have to add them to the tailscale.
you click on add machine then client you will then choose your local os.
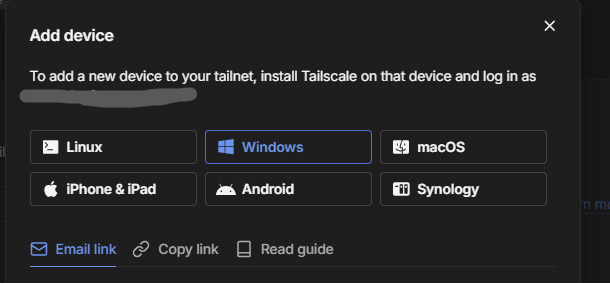
now that you can do this try to ssh your server with the tailscale ip address.
|
|
it should be loggin into it normally
2. Setup Ubuntu UFW
Here now you have to know what ports you want as public open ports. For me on this server I am going to use it for webserver api so I will open the 80/tcp and 443/tcp which are just HTTP and HTTPS. and I will only allow the port 22 on tailscale only. To do so you have to list the interface in which tailscale connected to.
ip -br a

for me tailscale is on interface tailscale0 normaly it’s that but you can double check yours
and now run the following on the ufw
sudo ufw default deny incoming
sudo ufw default allow outgoing

sudo ufw allow in on tailscale0 to any port 22 proto tcp

sudo ufw allow 80/tcp
sudo ufw allow 443/tcp

sudo ufw logging on
sudo ufw enable
sudo ufw status verbose
this should be your ufw status verbose result
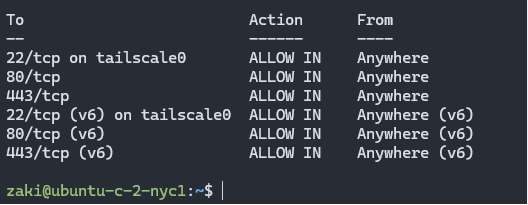
again this is an api/webserver if your server is other services like ftp or database or email you should only allow your public ports you want
Vendor FireWall setup too
when you finish setting up the linux ufw you should also setup the vendor which right now is digitalocean with the same firewall rules so that it doesn’t even have to reach your server before the request get dropped
go to the networking tap on the digitalOcean dashboard and select firewall
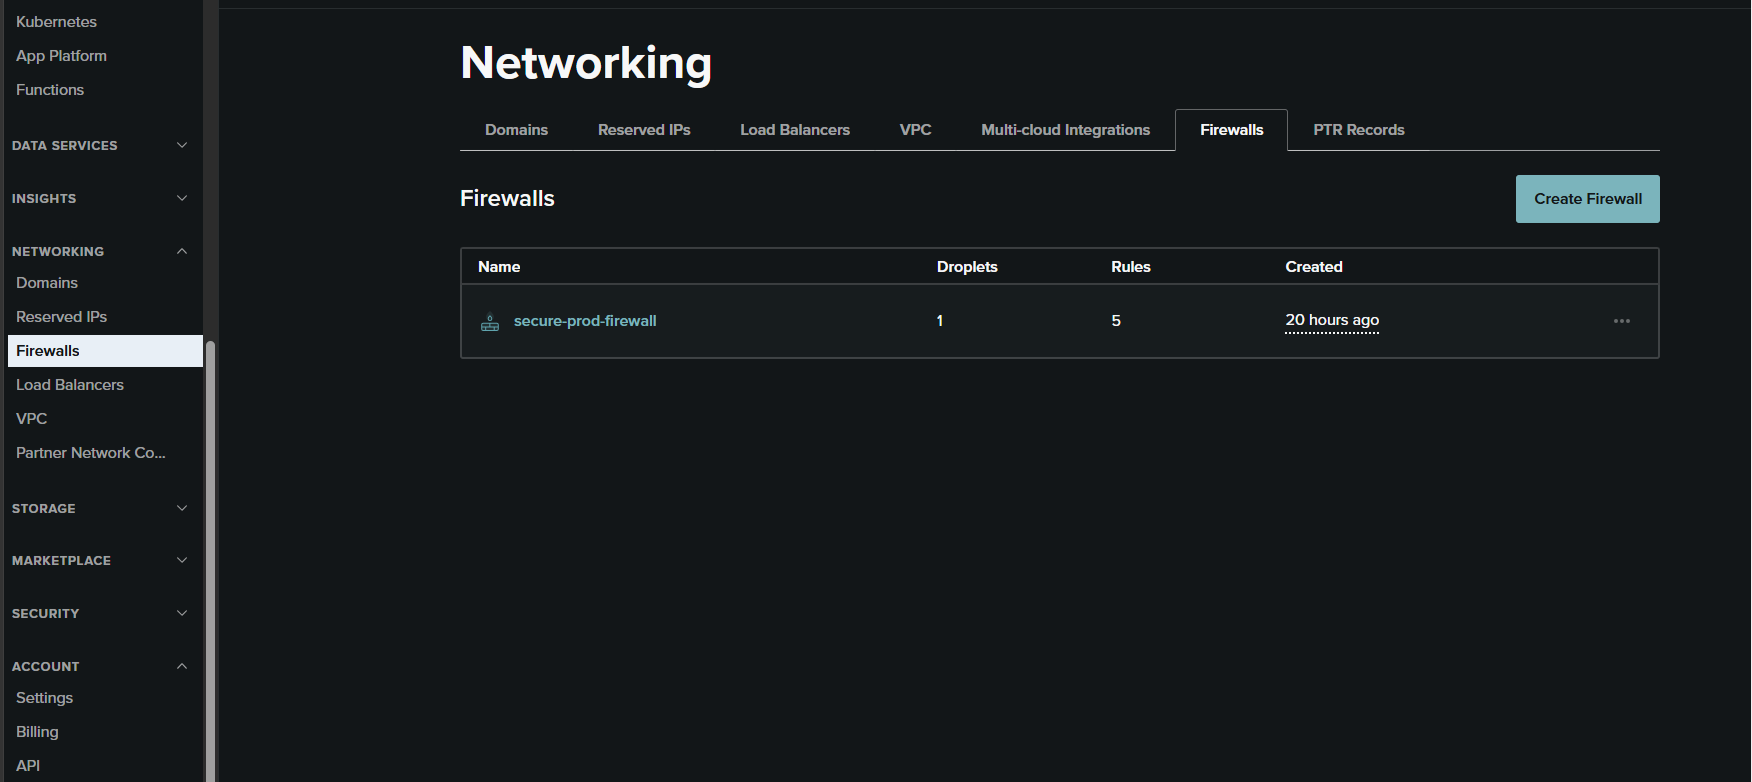
click on create firewall
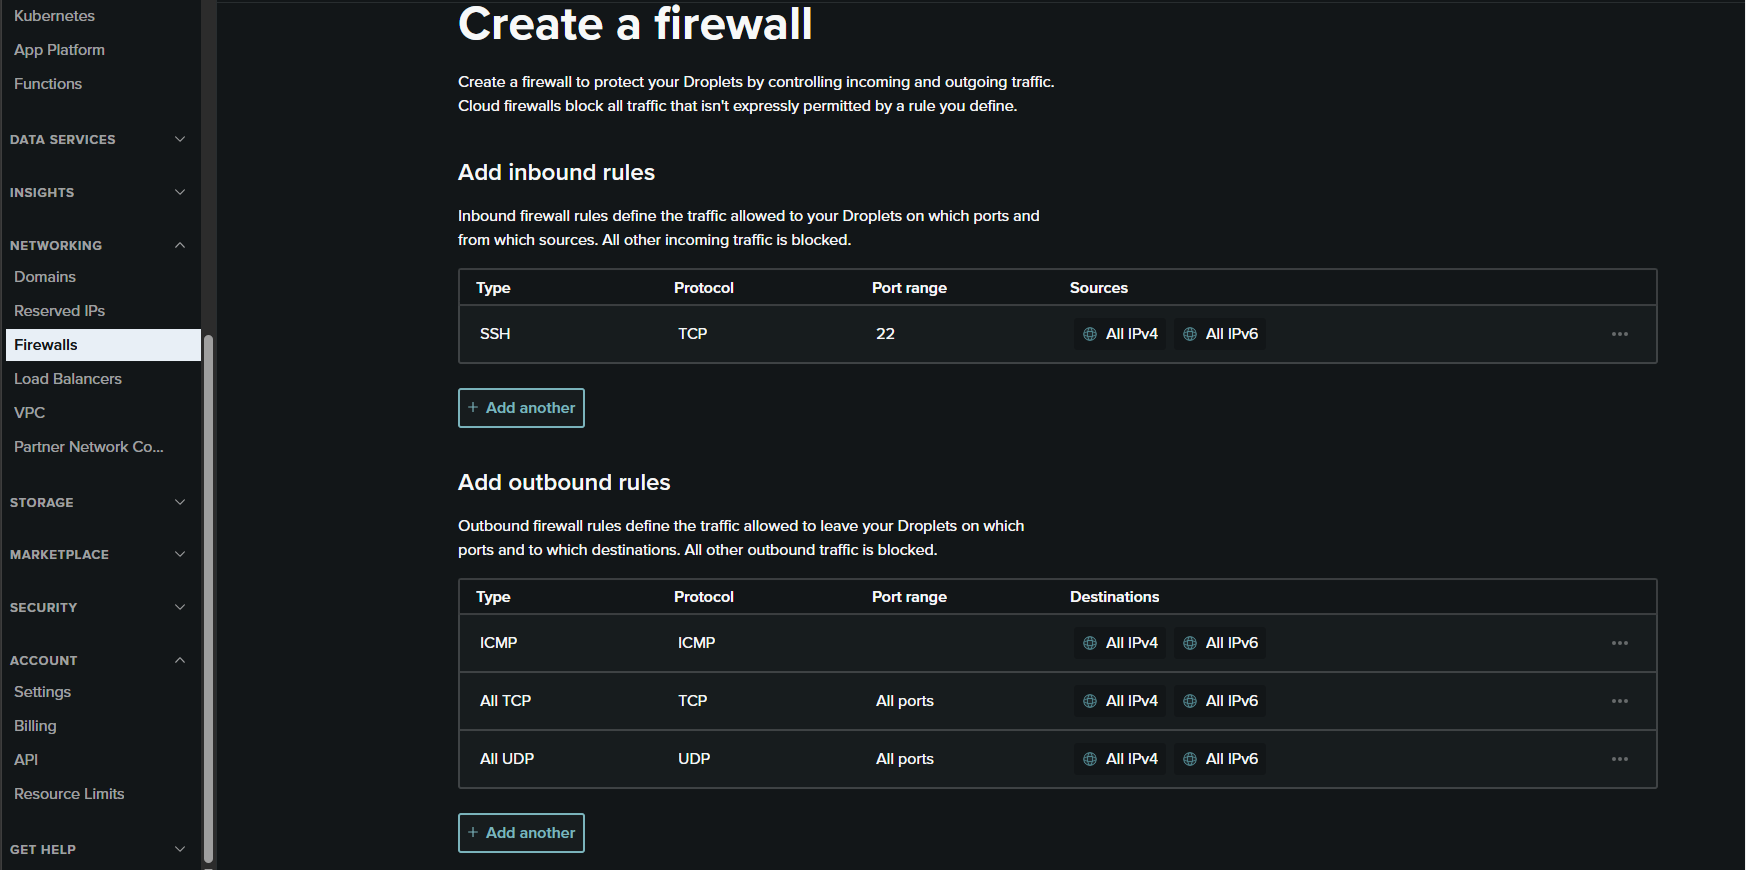
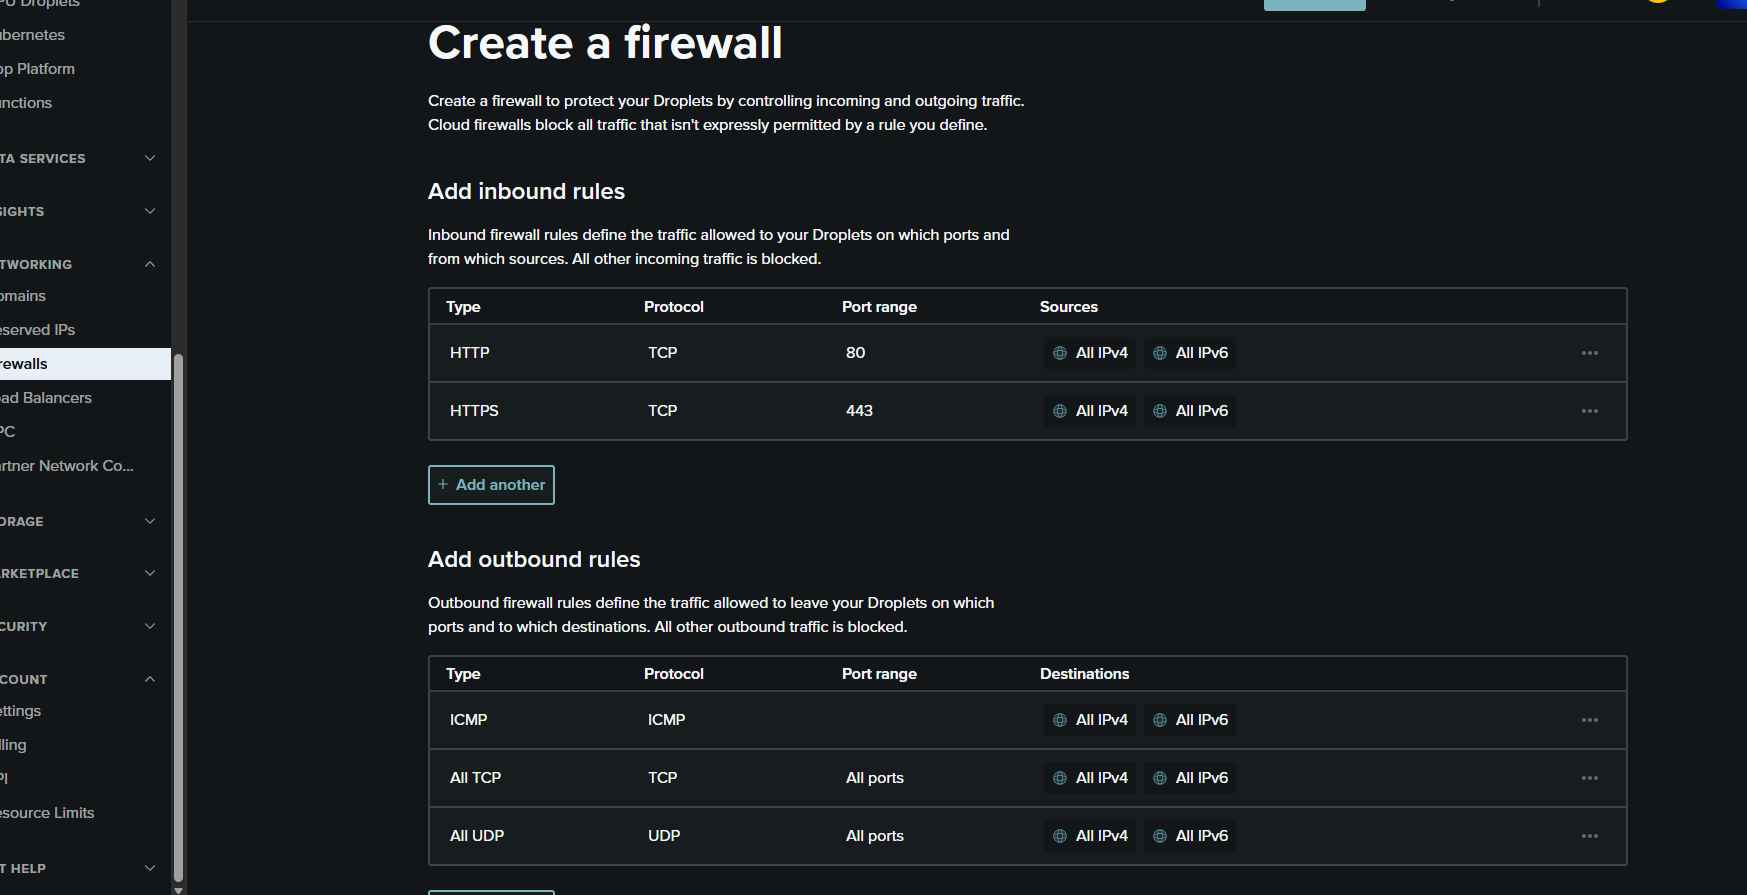
and now also attach the droplet this firewall apply to to you can select multiple droplet and give it a name and then create
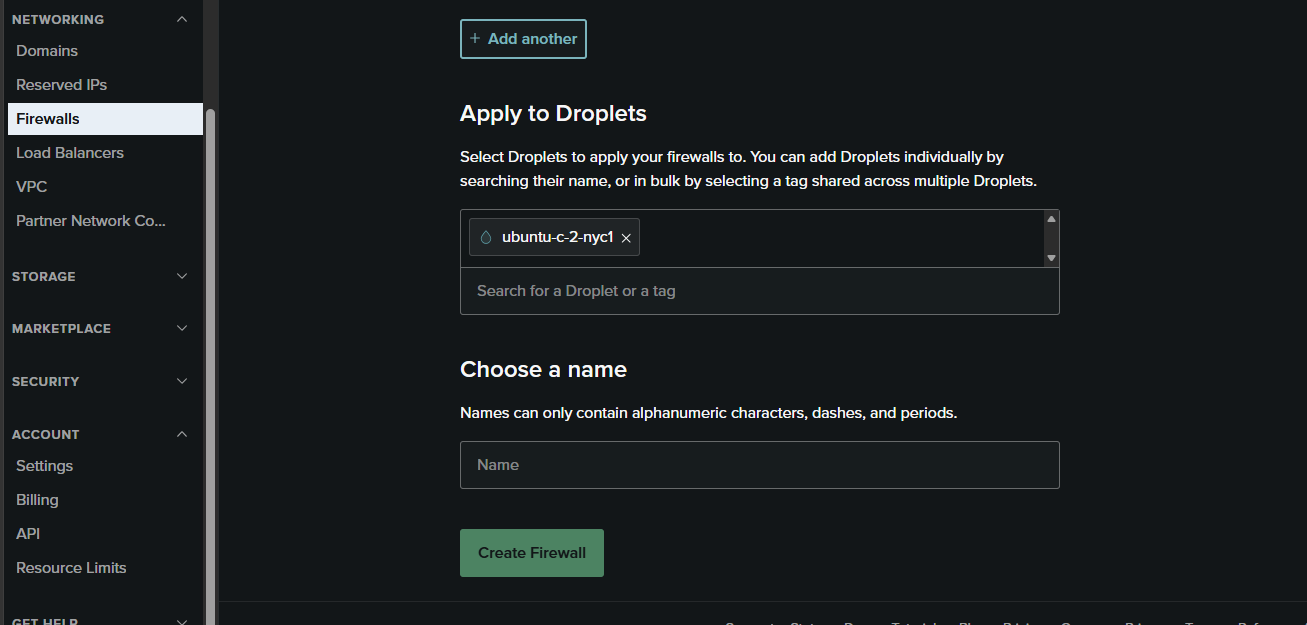
click create and it’s set
Automatic Security Updates
Now that we setup everything we need automatic secuirty updates using unattended-upgrades
sudo apt install -y unattended-upgrades
install unattended-upgrades
sudo dpkg-reconfigure --priority=low unattended-upgrades
This command forces the system setup wizard to open and show all available options, allowing you to explicitly toggle automatic security updates to “Yes” and activate the background update timers.
now we have to edit the unattended-upgrades config file
sudo nano /etc/apt/apt.conf.d/50unattended-upgrades
you have to set these config on the file or just copy and past it to the end of the file
Unattended-Upgrade::Remove-Unused-Kernel-Packages "true";
Unattended-Upgrade::Remove-New-Unused-Dependencies "true";
Unattended-Upgrade::Automatic-Reboot "false";
we set it as a schedule
sudo nano /etc/apt/apt.conf.d/20auto-upgrades
and update these config or add them to the end of the files
APT::Periodic::Update-Package-Lists "1";
APT::Periodic::Unattended-Upgrade "1";
APT::Periodic::AutocleanInterval "7";
Now let’s configure apt-listchanges to save everything to a clean log file instead of trying to email or show it on screen. install apt-listchanges
|
|
now configure it to save the changes of unattended upgrade do on a log file we can also make it email us the mail is setup but yeah
|
|
then place these configurations
|
|
verify these config
sudo unattended-upgrades --dry-run --debug
systemctl status unattended-upgrades
Fail2ban configure it
We need a way so that if there is a repeated attempt of login it blocks that ip address for certain amounnt of time
install
sudo apt install fail2ban -y
then open it’s config
sudo nano /etc/fail2ban/jail.local
now place this configurations
place in your tailscale subnet ip on ignoreip
[DEFAULT]
backend = systemd
bantime = 1h
findtime = 10m
maxretry = 5
ignoreip = 127.0.0.1/8 Tailscale subnet

[sshd]
enabled = true
port = ssh
mode = aggressive
now restart the service
sudo systemctl enable --now fail2ban
sudo systemctl restart fail2ban
check the service
sudo fail2ban-client status
sudo fail2ban-client status sshd
Linux Kernal Security
we add more config but to the kernal
sudo nano /etc/sysctl.d/99-hardening.conf
and now we place in this configurations
# Protect against connection exhaustion attacks
net.ipv4.tcp_syncookies = 1

# Prevent unprivileged users from viewing kernel debug logs
kernel.dmesg_restrict = 1
now apply it
sudo sysctl --system
Audit and Logs
Firstly you have to use a accurate time for the server logs it’s better if we use UTC for all server or you can use your local time
1. Time
|
|
or you can set time to your local time
|
|
this is my local time
2. Auditd
auditd is a powerful system monitoring tool that records deep system activity like who modified a file, changed the system clock, or ran a specific command.
install
|
|
from now on you can use the command to view the latest all logged in and so on there is more commands check the man page or there documentations website
|
|